The post From Trust to Expertise: How to Choose the Best DevOps as a Service Partner appeared first on SHALB.
]]>
Outsourcing involves delegating tasks or projects to an external team that completes the work independently. This business model ensures efficiency, quality, and timely delivery. In contrast, outstaffing – a type of remote recruiting model – might be more cost-effective in the long run, but it leaves the employer dealing with the human factor, being responsible for the productivity and work pace of the outstaffed workers. Outsourcing, on the other hand, frees you from managing and controlling the project workflow, delivering just the final result.
So, what key factors should you consider to ensure you make the right choice?
Trust
When choosing a DevOps as a Service company, it’s ideal to rely on recommendations. If you don’t have this option, assess the company’s experience. How long have they been in the market? Review their portfolio of completed projects, especially those in the same sector as yours. This is particularly important in sectors like fintech and banking, where strict security regulations can significantly limit or even deny the provider access to the production environment during development. If they have relevant projects, case studies detailing the implementation can be invaluable.
A company’s reputation is a strong indicator of whether you can trust them, especially regarding data security, due diligence, and business practices. A key marker of trustworthiness is the company’s longevity in the market—if they meddled with customer data or caused some significant business disruptions, they likely wouldn’t have survived long.
Expertise
When engaging a third-party contractor, one of the primary concerns is their expertise: do they have the right skills? Can they truly deliver? The best way to verify this is by organizing a meeting between your technical team and theirs. It’s highly advisable to include the principal engineer or the technical lead who will be in charge of your project. This will help you determine two things: 1) whether the provider’s team has the necessary skills to deliver the project, and 2) whether your teams can communicate effectively and work well together—an essential factor for project success.
During the technical interview, you can also assess the company’s expertise with your desired tech stack. It’s crucial to ensure they have strong competence in your system’s core components like cloud platform, database engine, app orchestrator, etc. Don’t be discouraged if they lack experience with supplemental technology; the modern DevOps ecosystem is vast, and no team can master everything. If they have experience with a similar technology, they’re likely to adapt quickly. Unlike in-house engineers, who often work in silos and with the same stack for years, a DevOps as a Service team must constantly learn new technologies and tool integrations as they serve different customers.
As technology sectors expand, having specialized roles within the team is an added benefit. For example, bringing in a specialist for a specific task, such as an SRE, cloud architect, or Kubernetes administrator, is more efficient than relying on one person to handle everything. And this is also another reason why outsourcing is better than outstaffing: does your service company use engineering roles to provide you with a highly skilled team?
Organization of Processes
Once you’ve shortlisted potential candidates, it’s crucial to understand their workflow and project management routines. Key questions to ask include: How is communication with customers organized? How are tasks assigned and managed? How do they keep customers updated on task progress? Do they offer any guarantees on their work? These factors will give you insight into how smoothly your collaboration might run.
Estimating the Scope of Work
Accurately estimating the complexity of a DevOps project requires more than just a phone call. The process should be extensive, thorough, and meticulous. It’s essential to consider both business expectations and developers’ demands to gain a full understanding of existing and potential issues.
A detailed estimation not only provides clarity but also helps minimize unforeseen costs that might arise later. Imagine a scenario where the provider, upon completing their work, charges more because certain issues only became apparent after the project began. This could be a negative experience, especially if your budget is tight. A comprehensive estimation allows you to forecast ongoing expenses and agree on a fixed price for the project.
Standard Agreement Conditions
Carefully review the company’s standard contract, paying particular attention to the terms and conditions. Although these can be customized to your needs, the provider will likely adhere to the standard terms since their processes are tailored to them.
The contract should also include provisions for data safety and the security of your infrastructure, along with liabilities for non-compliance. This demonstrates the company’s diligence and commitment to their responsibilities.
Project Completion and Delivery
For DevOps as a Service, completion should not simply involve signing off on a certificate of acceptance. Providers that insist on this may pressure you to approve the quality of services before you can fully evaluate them. Given the nature of DevOps, the quality of services can only be truly assessed after the project has been live and in use for some time. Reputable companies understand this and include a probation period in their agreements, during which they remain available for technical support and consulting.
SRE and 24/7 Support
Ideally, a DevOps as a Service provider should not only build infrastructures but also offer round-the-clock support and maintenance. Why is this important?
Firstly, the availability of 24/7 support demonstrates the company’s commitment to high-quality service. It shows they are willing to go the extra mile, knowing that their support team will be responsible for handling any issues that arise. A provider that simply completes the work and moves on may be more likely to cut corners, leaving you with a solution that lacks consideration for long-term maintenance.
Secondly, if the company offers Site Reliability Engineering (SRE) services, it likely has multiple locations around the globe to cover different time zones. This global presence is excellent for creating efficient workflows, allowing for better scheduling of shared meetings, real-time communication, and quick issue resolution.
DevOps outsourcing with SHALB
With over 15 years on the market, SHALB has delivered over 300 successful projects across various sectors, including fintech, data science, blockchain, retail, and automotive. This extensive experience is reflected in the AWS partnership certification and positive recognition on the Clutch platform.
SHALB’s core expertise spans DevOps, Kubernetes implementation, and cloud-native technologies, including migration, microservices containerization, infrastructure as code, and multi-cloud environment building. With teams located across various time zones and specialized roles within the organization, SHALB is well-equipped to adapt to the diverse needs of its customers.
The company’s workflow is anchored in Agile principles, emphasizing a stage-by-stage approach. This includes a comprehensive review of a customer’s infrastructure, resulting in a detailed roadmap with suggested improvements and defined tasks. After project completion, we remain available for ongoing maintenance and technical support, with quality assured through the financial responsibilities outlined in the agreement.
When looking to future-proof your infrastructure against the challenges of tomorrow, consider the factors discussed in this article. A provider like SHALB, with proven expertise and a structured approach, could be a strong partner for your journey forward. Book a call or get in touch via online form to learn more.
The post From Trust to Expertise: How to Choose the Best DevOps as a Service Partner appeared first on SHALB.
]]>The post The Cloud Era and Tech Innovations: What You Need to Know About IaC appeared first on SHALB.
]]>
In this article, we will explore what IaC is, focusing on its core principles, pros and cons, and future trends. We will also introduce popular IaC tools, explaining their basic functions and highlighting the differences between them.
Factors that set the scene for IaC
The mass adoption of cloud computing has significantly contributed to the rise of IaC that enabled efficient control over the growing number of cloud infrastructures’ components. Several factors have been vital in shaping the IaC concept:
- Shift to cloud-native development: The widespread use of containers has led to the rise of immutable infrastructure, an approach to provisioning that replaces virtual resources instead of modifying them. IaC has enabled the codification of infrastructure resources as templates, allowing for quick and easy setup of new environments.
- Need for automation in modern stacks: Modern infrastructures can consist of hundreds of components, making manual provisioning a daunting and impractical task. IaC introduced automation that allows organizations to manage their infrastructure at scale, avoid configuration drift, and swiftly apply changes across multiple environments.
- Increased role of developers in operations processes: In the cloud-native world, developers are increasingly required to handle provisioning tasks. IaC simplifies these operations, allowing developers to spin up ready-to-go infrastructures by merely executing scripts. Additionally, the accountability and transparency provided by IaC foster better collaboration between development and operations teams.
- Need for swift infrastructure changes: The dynamic nature of cloud environments demands infrastructures that can be rapidly spun up, scaled, and taken down as needed. IaC facilitates this flexibility, with all modifications being implemented through updates to configuration files.
Understanding Infrastructure as Code
Definition and principles
Infrastructure as Code (IaC) is a practice that involves managing and provisioning computing infrastructure through machine-readable configuration files instead of manual configuration. By introducing automation throughout all infrastructure processes, IaC reduces manual tasks while ensuring the consistency, repeatability and scalability of infrastructure setups.
The fundamental idea behind IaC is straightforward: treat your infrastructure as you would software and data. This means applying the same practices used in software development to your infrastructure, including version control, testing infrastructure code, and implementing continuous integration and deployment.
How IaC works
IaC is implemented through specific tools that automate system provisioning using their internal algorithms. Depending on the approach, IaC can be executed either declaratively or imperatively. Let’s take a closer look at these two methods.
Imperative approach
The imperative, or procedural approach is a “how” method: it focuses on outlining the precise steps needed to achieve the desired outcome. Therefore, it implies providing detailed instructions or scripts that specify the exact order in which to execute tasks. This approach allows for granular control over configuration and deployment by detailing each step; however, it requires advanced coding skills from engineers.
Declarative approach
In contrast, the declarative approach emphasizes the “what” rather than the “how.” Using a domain-specific language, engineers specify the desired end state in configuration files, leaving it to machines to decide what needs to be done and in which way to achieve this. The declarative code is easier to manage and requires fewer coding skills.
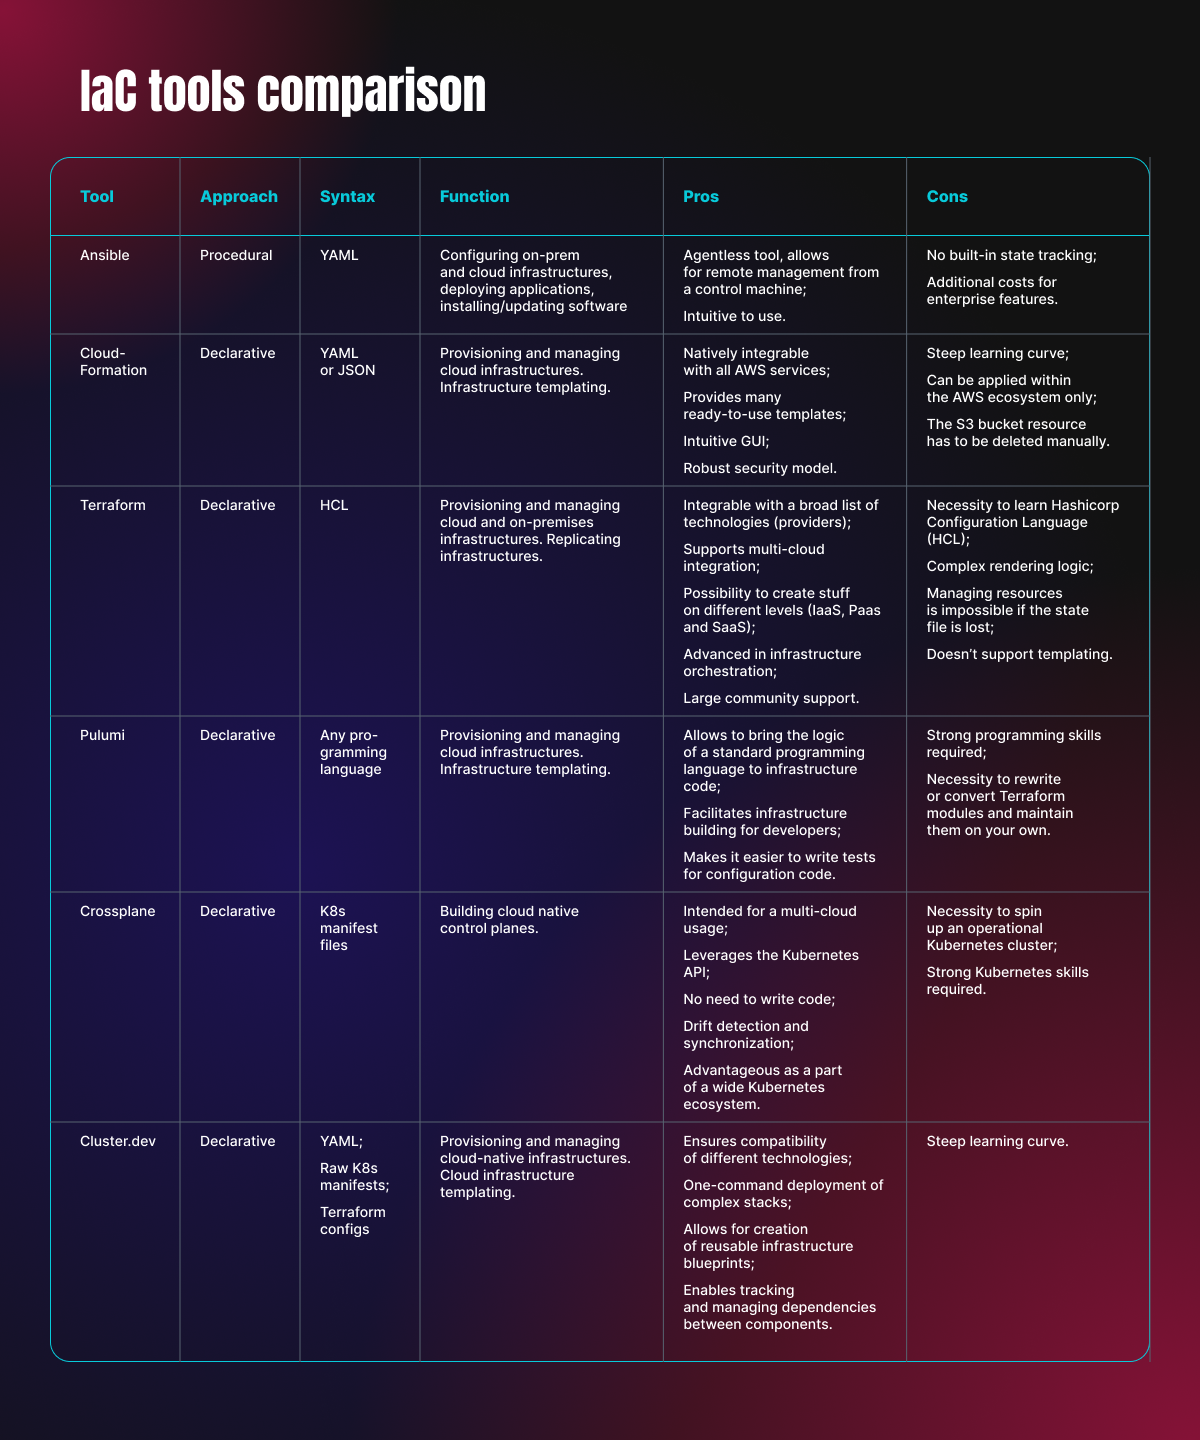
IaC tools
There is a wide range of tools available for implementing IaC, each designed for different use cases and offering various approaches, configuration methods, scripting languages, and file formats.
Early IaC tools were more procedural, focusing on the specific steps required to reach the desired state, such as Chef and Ansible. Their code contained elaborate instructions, and so was difficult to read and understand.
With cloud-native development the trend moved towards a more declarative style of IaC, with tools like Terraform and AWS CloudFormation leading the way. Their code is lighter and more readable as it consists primarily of configuration settings.
The big advantage of declarative tools is their ability to store state: by constantly comparing the actual state with the desired one, they “know” when something fails and act to reconcile the state. The continuous drift check performed by declarative tools allows them to identify what needs to be changed, added, or created.
The table below highlights popular IaC tools and summarizes their most distinctive features.
Benefits of Infrastructure as Code
Implementation of the IaC practice allowed to efficiently address the following challenges:
- Consistency and repeatability. One of the main issues with manual infrastructure setup is its unpredictability: the same script may yield different outcomes every time it is executed. In contrast, codifying infrastructure provides a template that ensures you can deploy the same set of resources repeatedly, achieving consistent results across different cloud platforms.
- Speed and efficiency. IaC takes a huge load off engineers by automating the tasks of configuring, deploying, or redeploying infrastructure after every change. With IaC, you can quickly apply a single configuration across multiple environments. When updates are needed, you simply adjust the configuration files, and the IaC tools handle the deployment and provisioning automatically.
- Keeping up with changes and updates. Manual infrastructure setup can make tracking changes a guessing game for the rest of the team: it’s hard to know who made what changes and why. By keeping infrastructure code in a version control system (VCS), IaC provides clear visibility of changes, fostering better collaboration between teams.
- Fewer Mistakes. IaC helps ensure higher quality code through VCS-enabled code reviews. Since changes to infrastructure are made via code that undergoes checks, the risk of crashing the infrastructure by making direct changes is significantly lower.
- Documentation. IaC code is clean and readable by both machines and humans. Additionally, it’s self-documenting, providing a clear overview of existing resources and configurations.
- Cost Optimization: IaC provides a complete inventory of your cloud resources, detailing which services run on which platforms. Regular code reviews enable you to identify idle resources and shut them down, helping to optimize costs.
Challenges
Adherence to routine. When implementing IaC, it’s crucial to strictly adhere to the rules and practices agreed upon with your team. Although it may be tempting to make quick minor changes manually instead of following all the procedural steps of the IaC pipeline, doing so undermines the core principle of IaC. At first avoiding manual changes might seem like a longer road, but ultimately it saves time in the long run.
Time investment in learning. Adopting any new technology, no matter how user-friendly, demands a significant investment of time and effort for successful onboarding. When working with IaC tools, you need to understand their unique logic and domain-specific languages, which can vary from tool to tool. Achieving proficiency with these tools requires a certain level of commitment and time investment in the beginning.
Spread of mistakes. If unnoticed, an error in the codebase can be automatically propagated across multiple environments, leading to widespread misconfiguration and other issues.
Future trends
Victor Farcic, a Developer Advocate at Upbound, believes that the future of IaC tools is closely related to Kubernetes. This technology has become so deeply ingrained in modern IT environments that it will eventually operate behind the scenes, much like hypervisors: everyone who creates a virtual machine in the cloud uses them, often without even knowing they exist. According to Farcic, the current IaC toolkit will evolve into a new generation of tools called control planes. These tools will feature drift detection and automatic synchronization, allowing machines to detect changes in the current state and remediate them without waiting for human command. Additionally, these tools will leverage the Kubernetes API and a broad ecosystem of integrable tools.
Among the tools that extend Kubernetes will also be cloud controllers for Kubernetes: provider-specific tools designed to define and use cloud resources directly from Kubernetes. One such example is AWS Controllers for Kubernetes (ACK). These tools operate by making the Kubernetes API extensible to include resources outside of Kubernetes. With cloud controllers, you can describe the required resources in a Kubernetes manifest, enabling the Kubernetes API to create them, rather than creating them via the cloud console.
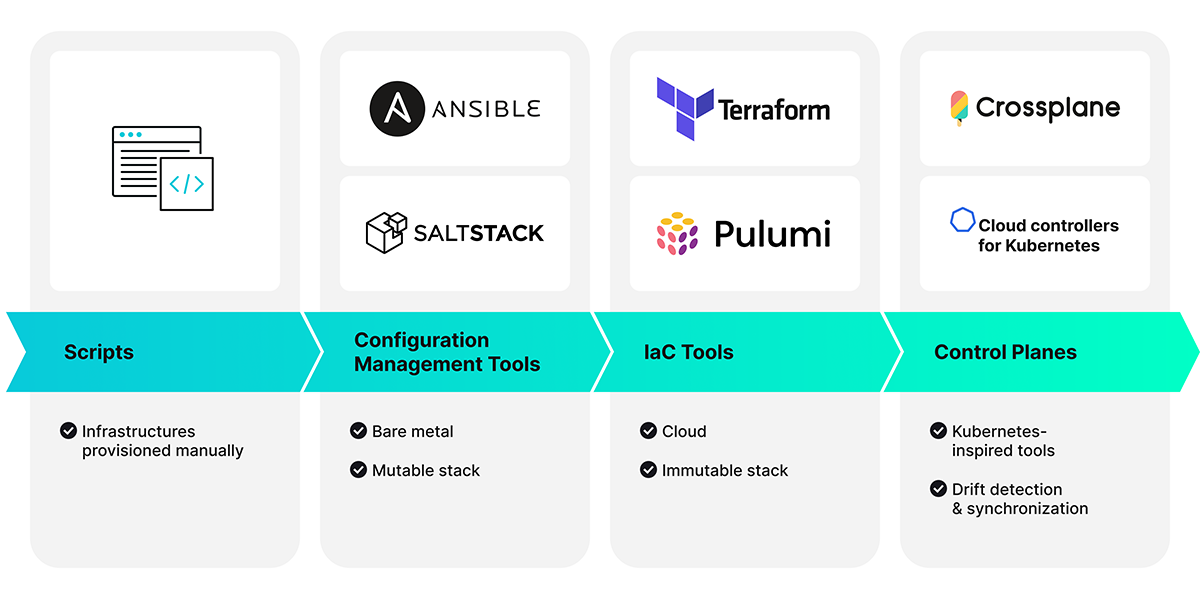
IaC tools evolution diagram
The growing trend to multi-cloud strategy will drive the rise of cross-cloud functionality that enables seamless integration of stacks running on different platforms. IaC tools with cross-cloud capabilities will be in the highest demand as organizations seek the most efficient ways to manage infrastructure across diverse platforms.
Conclusion
Infrastructure defined as code offers many advantages over manual provisioning, including version control, testing, faster provisioning, and software delivery. In the era of cloud-native computing, it’s no overstatement to say that IaC has become a cornerstone of modern IT strategy. As a key DevOps practice, it introduces automation at the infrastructure level. Its integration with established technologies like Kubernetes is paving the way for the emergence of more autonomous systems capable of self-optimization.
If you consider the future of your cloud infrastructure management, start your journey with SHALB and explore our comprehensive IaC services. Discover how SHALB can streamline your infrastructure setup and management, ensuring a seamless and optimized cloud experience.
The post The Cloud Era and Tech Innovations: What You Need to Know About IaC appeared first on SHALB.
]]>The post How to Grant User Access to Particular Namespace appeared first on SHALB.
]]>
In this article I will demonstrate how to grant user access to a specific namespace by using an authorization token and define their permissions with the Role-Based Access Control (RBAC) policies.
Granting user access with token
To create a user within a Kubernetes namespace and grant them access to specific resources, you begin by creating a ServiceAccount in your desired namespace. This ServiceAccount acts as the “user” for your applications or services running in Kubernetes. Next, define a ClusterRole that specifies the permissions you want to grant, such as access to pods, services, and other resources. Although cluster roles are cluster-wide, you can scope the permissions to a specific namespace by creating a RoleBinding within that namespace, linking the ClusterRole to your ServiceAccount. This setup ensures that the ServiceAccount has the necessary permissions only in the designated namespace, effectively creating a namespace-scoped user with access to particular resources.
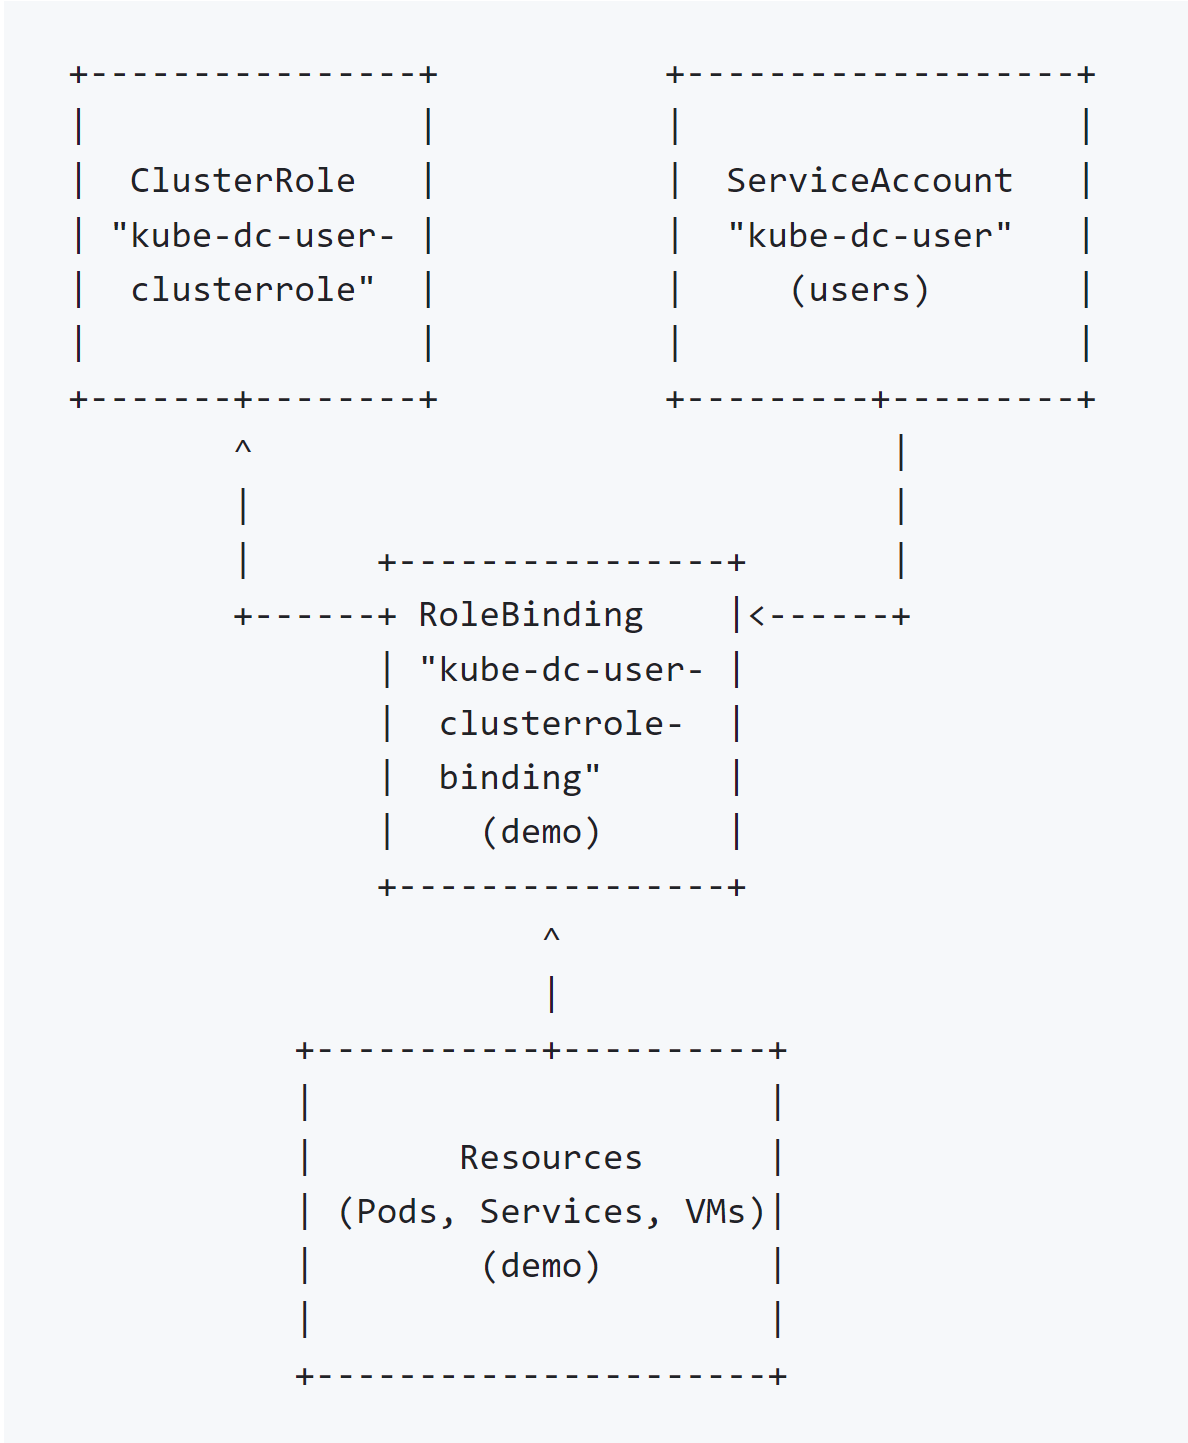
Step 1: Define a ClusterRole
Define a ClusterRole with the permissions you want to grant. This cluster role does not specify namespaces because it’s designed to be applicable cluster-wide.
apiVersion: rbac.authorization.k8s.io/v1
kind: ClusterRole
metadata:
  name: kube-dc-user-clusterrole
rules:
- apiGroups: [""]
  resources: ["pods", "services"]
  verbs: ["get", "list", "watch"]
- apiGroups: ["apps"]
  resources: ["deployments", "replicasets", "statefulsets"]
  verbs: ["get", "list", "watch"]
- apiGroups: ["cdi.kubevirt.io"]
  resources: ["datavolumes"]
  verbs: ["get", "list", "watch"]
- apiGroups: ["kubevirt.io"]
  resources: ["virtualmachineinstances", "virtualmachines"]
  verbs: ["get", "list", "watch"]
Step 2: Create a ServiceAccount
Users should be kept in permanent namespace users, and access would be granted for particular namespace by setting RoleBinding in particular namespace:
apiVersion: v1
kind: Namespace
metadata:
  name: users

apiVersion: v1
kind: ServiceAccount
metadata:
  name: kube-dc-user
  namespace: users
Also a secret token should be created:
apiVersion: v1
kind: Secret
metadata:
  name: kube-dc-user-token
  namespace: users
  annotations:
    kubernetes.io/service-account.name: "kube-dc-user"
type: kubernetes.io/service-account-token
Step 3: Create RoleBindings in Specific Namespaces
apiVersion: rbac.authorization.k8s.io/v1
kind: RoleBinding
metadata:
  name: kube-dc-user-clusterrole-binding
  namespace: demo
subjects:
- kind: ServiceAccount
  name: kube-dc-user
  namespace: users
roleRef:
  kind: ClusterRole
  name: kube-dc-user-clusterrole
  apiGroup: rbac.authorization.k8s.io
Step 4: Retrieve the ServiceAccount Token
Created token name is with the suffix -token added to existing user:
# Get the token for the user
kubectl get secret kube-dc-user-token -n users -o=jsonpath='{.data.token}' | base64 --decode
Using curl to Query the API
Here’s an example using curl to query virtual machines in a specific namespace:
SA_TOKEN=$(kubectl get secret kube-dc-user-token -n users -o=jsonpath='{.data.token}' | base64 --decode)
curl -k -H "Authorization: Bearer $SA_TOKEN" \
https://demo.kube-dc.com:6443/apis/kubevirt.io/v1/namespaces/demo/virtualmachines
Create a kubeconfig from token
If you’re using kubectl on your local machine, you can temporarily set the KUBECONFIG environment variable or modify your kubeconfig file to use the Service Account token. This approach is useful for manual inspections or when scripting interactions with Kubernetes.
First, create a new kubeconfig file or modify an existing one to include the Service Account token. Here’s a basic example of how to set up a context that uses the Service Account token.
Get the API server address:
APISERVER=$(kubectl config view --minify -o jsonpath='{.clusters[0].cluster.server}')
Get the CA certificate (if needed):
kubectl get secret <service-account-secret-name> -n <namespace> -o jsonpath='{.data.ca\.crt}' | base64 --decode > ca.crt
Replace <service-account-secret-name> and <namespace> with the actual secret name and namespace.
Create a kubeconfig file.
Here’s an example of adding a new user, context, and cluster in your kubeconfig. You might want to add this to an existing kubeconfig file or create a new one specifically for this purpose.
apiVersion: v1
kind: Config
clusters:
- name: my-cluster
  cluster:
    certificate-authority: /path/to/ca.crt  # Adjust the path as needed
    server: https://<api-server-address>    # Use the APISERVER variable
users:
- name: kube-dc-user
  user:
    token: <your-service-account-token>
contexts:
- name: kube-dc-user@my-cluster
  context:
    cluster: my-cluster
    namespace: <namespace>  # Specify the namespace if desired
    user: kube-dc-user
current-context: kube-dc-user@my-cluster
Replace <api-server-address>, <your-service-account-token>, and <namespace> with your actual API server address, the token you retrieved, and the namespace you want to use.
Conclusion
The RBAC policies and authorization via tokens are critical features of Kubernetes cluster security that allow you to control who can do what in each namespace. Following the steps described in this article will help you define user permissions within a certain namespace granting granular user access to cluster resources.
The post How to Grant User Access to Particular Namespace appeared first on SHALB.
]]>The post Kubernetes cluster upgrade cheat-sheet appeared first on SHALB.
]]>
These guidelines assume that your workloads are stateless, as they should be in Kubernetes. As always, plan operations related to data storage especially carefully (Persistent Volumes) – it is always recommended to have a backup. Storing data on local volumes is highly undesirable as it goes against best practices.
Before upgrading
- Before you begin, it is advisable to have scheduled automated backups in place, performed by Velero. If automated backups are not available, make manual backups of any non-recoverable manifests, if applicable.
- For self-managed clusters perform an etcd (state database) backup.
- Do NOT upgrade the production cluster during business hours.
- Perform a test upgrade on a non-production cluster and document every action and problem encountered, along with the steps taken to resolve them. These notes will serve as the foundation for your production deployment plan.
Remember
- The Kubernetes control plane does not provide native support for rollback, particularly in managed clusters where you have limited control over the underlying etcd.
- Kubernetes is a resilient platform. If you make a mistake during the upgrade process, you can always fix it because you have all the actual manifests and configurations of your workloads.
- Having a deployment plan can reduce downtime to a minimum and save your mental health!
Slow and safe Kubernetes upgrade

A measured and hassle-free upgrade, performed in a way that is generally recommended.
- Upgrade your Kubernetes cluster consistently, one minor version at a time. For example, if you are currently on version 1.x, upgrade to version 1.x+1.0. This approach ensures a smoother transition and allows you to address any potential issues in a more manageable way. Upgrading directly to the latest version can introduce more complexities and may require additional time and effort to troubleshoot and fix any problems that occur.
- Before upgrading, make sure that all components of your Kubernetes cluster are running the same version. This includes both the control plane and worker nodes. Having mismatched versions can lead to compatibility issues and potential errors during the upgrade. For instance, if your control plane is running version 1.24 while one or more of your worker nodes are running version 1.23, it is necessary to update the nodes to match the control plane version before proceeding with the upgrade.
- For a large cluster that hosts a diverse range of applications, make a one-week pause between cluster upgrades. This will allow for sufficient time to identify and address any unforeseen issues or mistakes that may arise following the upgrade. Although the initial upgrade is performed on a non-production cluster, it is important to remember that developers are also clients in this context. Incorporating this pause allows for internal testing and validation, giving developers an opportunity to provide feedback and report any issues they may encounter.
1. Read this official source of truth regarding the version you upgrade to.
2. Find removed API resources in a version you upgrade to by checking the official deprecated api doc.
3. It is always important to identify whether your cluster has deprecated resources which are removed in the version. For example, extensions/v1beta1 moved to networking.k8s.io/v1 or apiextensions.k8s.io/v1beta1 moved to apiextensions.k8s.io/v1.
-
- If a deprecated resource belongs to a public chart, simply upgrade the chart.
- If a deprecated resource belongs to your company’s in-house application, adjust your yaml manifest to the new scheme. The `kubectl explain …` command will help you with that.
4. Upgrade control plane(s) – one minor version at a time, one control plane at a time. This is extremely easy with managed clusters, like EKS.
5. Upgrade nodes – one version at a time.
-
- If your critical production applications are not distributed among multiple nodes, it can result in downtime for your clients due to a node failure or maintenance. To address this, it is recommended to define a Pod Distribution Budget (PDB) and set up pod anti-affinity rules. Remember, while Kubernetes provides built-in fault tolerance mechanisms, it is essential to manage your workloads wisely by leveraging these features.
- In AWS it comes down to changing the launch template AMI to the newer kubelet version and refreshing an Auto Scaling group.
- In modern Kubernetes environments, it is generally considered a best practice to avoid manually upgrading the kubelet version on individual nodes. Instead, a recommended approach is to treat nodes as disposable entities and automate the process of launching new nodes with the desired kubelet version.
6. Upgrade cluster addons, if EKS. For more details see the official documentation: https://docs.aws.amazon.com/eks/latest/userguide/managing-add-ons.html
Example command to upgrade cluster addons to Kubernetes version 1.26:
1 | <strong>aws eks describe-addon-versions --kubernetes-version 1.26 --query 'addons[].{MarketplaceProductUrl: marketplaceInformation.productUrl, Name: addonName, Owner: owner Publisher: publisher, Type: type}' --output table</strong> |
7. Upgrade a CNI plugin for a self-managed cluster (skip this step if the cluster is managed).
-
- Different CNI plugins may have specific requirements and compatibility limitations with certain Kubernetes versions. Before upgrading, it is crucial to check the compatibility of your installed CNI plugin with the version you are planning to upgrade to. Fixing a non-functional CNI can be a challenging task, as it directly impacts the networking capabilities of your cluster and can lead to service disruptions.
8. Monitor the upgrade. Closely monitor the upgrade process to identify and resolve any issues that arise. Keep an eye on logs, metrics, and alerts to ensure the cluster and applications are running smoothly post-upgrade.
After upgrading
– Check if all pods are running.
– Test your frontend functionality.
– Check for errors in your central monitoring system.
– Repeat the latest successful deployment to the cluster.
– Check whether the internet is reachable and DNS resolves external names.
– Check whether one pod can reach another pod running on another node.
9. Repeat in production.
10. Go to step 1 with the next minor version.
Mad Max style Kubernetes upgrade

A Mad Max style upgrade is a daring and adventurous approach to Kubernetes cluster upgrades. It involves a rapid cluster upgrade considering the fact that issues will arise along the way. While it can be an exciting challenge, it requires a confident and well-coordinated team to handle any potential issues that may occur.
Another important consideration is the availability of downtime. Cluster upgrades can be complex, especially when changes are coupled with various repositories, CI/CD configurations, and code changes. The process may involve fixing issues, submitting pull requests (PRs), and iterating on fixes multiple times, which require time and coordination. I would not recommend this option unless you have at least one week of downtime to play with a staging/dev cluster.
- Upgrade Kubelets to the latest version skipping minor versions.
- Upgrade control planes one version at a time.
- Fix broken things afterwards with ChatGPT.
- Write notes to a deployment plan.
- Repeat in production on Friday (Mad Max works on weekends sometimes).
Safe and fast Kubernetes upgrade

This option is basically a blue-green upgrade to the latest cluster version. This method is particularly straightforward if your applications do not rely on persistent volumes (PVs). It is also considered one of the safest and fastest ways to upgrade your cluster.
The process involves creating a new cluster with the latest version of Kubernetes. Once the new cluster is created, you replicate your workloads, configurations, and dependencies, then gradually switch traffic from the old cluster to the new one.
An advantage of this approach is that you can easily roll back to the previous cluster if any issues arise during the upgrade process. By keeping the old cluster intact and operational, you have a fallback option in case of any unforeseen problems. The disadvantage is working on your own isolated branch(es) for a long time and performing a difficult merge in the end.
Conclusion
Given widespread adoption and vigorous community support, Kubernetes is likely to preserve its leadership in container orchestration for the foreseeable future. For individuals with Kubernetes skills, this means that their expertise will remain relevant and in-demand for a considerable time. Understanding how to upgrade and manage Kubernetes clusters is an essential part of maintaining Kubernetes-based infrastructures.
The post Kubernetes cluster upgrade cheat-sheet appeared first on SHALB.
]]>The post Cloud Native Infrastructure Layering and Templating appeared first on SHALB.
]]>Why Do We Need Infrastructure Templates?
Infrastructure templates are important in simplifying cloud development and maintenance. They form functional boundaries, streamlining infrastructure development. They also define component compatibility and deliver infrastructure as part of the product. Templates can “flow” from one team to another and enable the division of responsibilities between the platform team and the SRE (Site Reliability Engineer) team. Templates are also used to apply the GitOps approach for each infrastructure component.
For a broader understanding of the benefits of infrastructure templates, let’s take a look at the main ways they can be used.
Infrastructure Growth and Promotion
To simplify the development and promotion of some application features, a conveyor is used. The application deployment and testing process works on the same principle. You can use common infrastructure templates and versions from Git to do this. This enables you to integrate with your existing CI/CD solution and optimize feature development and promotion across different environments.

Responsibility Delegation Within the Team
Infrastructure templates are important to use in developing companies where several teams are emerging and working together. For example, the platform team develops templates in the form of a complete Infra Template and passes them to the SRE team. They are already being used to deploy and operate the production infrastructure.

The same Infra Templates can also be used by developers and quality assurance engineers to create temporary development and testing infrastructures. By using a standards-based template across teams, they can then optimize and simplify collaboration.
Software Delivery
When working with large business applications, complex infrastructure is required prior to deployment. To simplify the process of deploying an enterprise solution, vendors can include an infrastructure template with their product. In this way, they can allow businesses to quickly set up the necessary infrastructure needed to run their applications without the need for time-consuming manual configuration. This streamlines the deployment process and makes it easier for enterprises to launch the vendor’s product quickly.

Template Stores
Another helpful use case for templates is to quickly deploy new infrastructure for testing or research with minimal effort. To do this, you can select a template from a Github project or marketplace, set up the necessary values, and launch the infrastructure in minutes.
Templates can greatly simplify the workload for DevOps and SRE teams, especially when deploying and testing in complex environments.

Next, we’ll cover the key components (layers) needed to create infrastructure templates.
Tiered Infrastructure
Today’s cloud infrastructures have many layers to consider. Let’s list the main ones:
- Network layer
- Permissions layer
- Infrastructure and OS layer
- Data management layer
- Application layer
- Observability layer
- Configuration Layer

Various technologies and tools can be used to effectively implement these layers. Let’s look at how you can work with each of them.
Network Layer
In today’s cloud environments, software-defined networks and cloud APIs have simplified the presentation of networks as code. This has largely eliminated the need for manual network configuration. We have two basic approaches to defining cloud networks in code:
- Using Terraform modules designed to define a cloud network. For example, Terraform modules can create VPC resources on AWS, deploy a GCP virtual private cloud (VPC), or use the Terraform Azure RM module for networking.
- Implementing networking at the container orchestration level, such as Kubernetes. Numerous networking plugin (CNI) options are available, including such tools as https://www.projectcalico.org/ or https://cilium.io/. These tools usually come as Helm charts along with Kubernetes manifests, making them easy to install and use.
Permissions Layer
Detailed permissions are declared at different layers of the infrastructure. Here are a few common examples:
To install infrastructure permissions, you can use Terraform modules for IAM and roles. For example, Terraform modules are available for creating IAM resources in AWS and for managing multiple IAM roles in Google Cloud.
When setting up permissions in Kubernetes, a popular choice is to use your own RBAC. In some cases, external authentication with OpenID Connect tokens or other tools may be required.
To link Kubernetes permissions with cloud roles, you may need to use technologies such as AWS IRSA, Azure Managed Identities, or GKE Workload Identity. This requires combining Terraform modules with Kubernetes manifests, using the output of one technology as input for the other.
You can use Open Policy Agent (OPA) to create permissions and apply policies. This is a mechanism for declaratively writing policies as open source code. OPA can be used to authorize REST API endpoints. This also applies to defining infrastructure policies by permitting or disallowing Terraform changes.
Infrastructure and OS Layer
Using Terraform modules, you can also determine the infrastructure level. The following are suitable for this purpose:
- Terraform module for setting up GKE clusters
- Terraform module for Azure computing
- Terraform module for automatic resource scaling on AWS
In some cases, you may need to further configure images with cloud-init and scripts, which can be done with Hashicorp Packer or Ansible.
Data Management Layer
Most cloud service providers offer managed storage options. For example, AWS S3/EBS, GCP cloud storage, and Azure file and BLOB-objects storage. Managed databases such as AWS RDS, Azure Cosmos DB and Google cloud databases are also available. Using Terraform modules is the most common approach to describing such resources.
Application Layer
Applications hosted in the cloud are usually divided into two groups: infrastructure and business applications.
Applications in the first group are deployed together with the infrastructure and include tools such as Kafka, Service Mesh, Ingress Controller and GitOps Controller. Helm charts or bash scripts are typically used to deploy them.
To deploy business applications, CI/CD tools such as Jenkins and GitLab are typically used. We should note that the lifecycle of business applications is different from that of application infrastructure.
Observability Layer
Cloud service providers and external vendors offer a variety of monitoring and logging solutions, such as AWS CloudWatch, Google Stackdriver, and Datadog. These can be set up with Terraform.
For cluster monitoring and logging tools, Terraform or Helm charts are commonly used. This is typical for EFK or Prometheus/Grafana.
Configuration Layer
The Git repository is the most popular place to keep infrastructure code and configuration files. This method provides accountability and enables you to return to specific configurations from a specific time point.
It is important to save the resulting infrastructure state after applying a configuration that contains confidential data. To prevent potential security issues, it is recommended to store this data in a separate location. For example, in an object repository or database.
AWS SSM or Azure Vault can be used to store secrets and certificates. Hashicorp Vault or SOPS may be alternative repositories for such data.
Output
Let’s take a look at a diagram to see how we can depict a modern infrastructure using a specific set of tools for each layer:

Infrastructure templates greatly simplify the work of DevOps and SRE teams. They optimize deployment and testing in complex environments and make it more consistent. The SHALB team helps to implement such tools in large projects and startups. With years of experience, the company has integrated over 100 cloud infrastructures of varying complexity.
The post Cloud Native Infrastructure Layering and Templating appeared first on SHALB.
]]>The post Speeding up Grafana Loki queries by using cache appeared first on SHALB.
]]>
Sometimes, when we use Loki to visualize logs in Grafana, we may experience slow queries or even timeouts when processing large volumes of data. In this post I will show how to accelerate queries and make your dashboards work faster with Loki’s query cache. We will also practice how to find desirable logs faster by using Loki’s querying language.
Requirements
Kubernetes
You will need a Kubernetes cluster with Kubernetes v1.26.3 or newer. Some older versions should also be compatible, but you will need to try them.
Kubectl
We use Kubectl v1.26.3, see documentation on how to install it properly.
Helm
We use Helm v3.11.2, see documentation on how to install it properly.
Test environment setup
Kube-prometheus-stack
As a first step to take, we will install the kube-prometheus-stack Helm chart to deploy the basic monitoring stack. From there, we will use Grafana and Prometheus.
Apply this code to install the kube-prometheus-stack Helm chart to your Kubernetes cluster:
echo \
'
grafana:
  additionalDataSources:
    - name: Loki
      type: loki
      url: http://loki-gateway
      access: proxy
      editable: true
' \
> kube-prometheus-stack.yaml

helm repo add prometheus-community https://prometheus-community.github.io/helm-charts
helm repo update
kubectl create ns monitoring
helm upgrade --install kube-prometheus-stack prometheus-community/kube-prometheus-stack --version=45.7.1 -n monitoring -f kube-prometheus-stack.yaml
Memcached
We will use Memcached as a caching storage for our Loki installation.
Apply this code to install the Memcached Helm chart to your Kubernetes cluster:
helm repo add bitnami https://charts.bitnami.com/bitnami
helm install memcached bitnami/memcached --version=6.3.13 -n monitoring
Loki
To have our logs managed by Loki, we need to add the Loki Helm chart to our stack.
Apply this code to install the chart to your Kubernetes cluster:
echo \
'
loki:
  commonConfig:
    replication_factor: 1
  storage:
    type: "filesystem"
  auth_enabled: false
  memcached:
    results_cache:
      enabled: true
      host: "memcached"
      service: "memcache"
      default_validity: "1h"
singleBinary:
  replicas: 1
  persistence:
    enabled: true
    size: 2Gi
' \
> loki.yaml
helm repo add grafana https://grafana.github.io/helm-charts
helm repo update
helm upgrade --install loki grafana/loki --version=4.8.0 -n monitoring -f loki.yaml
Promtail
The Promtail agent collects our logs and sends them to Loki. To enable it for our installation, we need to add the Promtail Helm chart to our stack.
Apply this code to install the chart to your Kubernetes cluster:
helm upgrade --install promtail grafana/promtail --version=6.9.3 -n monitoring
Test our results
Now, having configured our test environment, let’s run a test query to check whether the cache is working.
Our Grafana service is running in a test environment, which is closed to external traffic. So, to access it, we need to forward the Grafana service to a local host. Let’s do this with kubectl by executing the command:
kubectl port-forward svc/kube-prometheus-stack-grafana -n monitoring 23000:80 > /dev/null 2>&1 &
In this command I specified the local connection port 23000. Normally, we use port 3000 as a default for Grafana. However, to avoid overlaps with local Grafana service on the host, I suggest adding 1 or 2 before 3000 to avoid using the same port by two services. Basically, you can use any port that is higher than 1024 as a connection point from your side.
1. Open Grafana in any web browser: http://127.0.0.1:23000
You can log in with default credentials or use your own if you specified them as values (variables) of the kube-prometheus-stack Helm chart.
Default credentials:
User: admin
Password: prom-operator
2. Open Explore section in our Grafana:

3. Pick Loki data source:

4. Enter test query to the command line:
rate({cluster="loki"}[5m])

5. Set the query interval to 24h:

6. Open the query inspector:

You will see that the total request time is 3.13 seconds. Now, if you run the query again, this time should be reduced:

That means that your cache is working!
How to speed up log search in Loki
LogQL, which is Loki’s querying language, has its own specifics and requires another approach to queries. Let’s see how its syntax can help us improve log search in Loki.
Sometimes you need to find some strings with a wide filter, as with this query:
sum(count_over_time({stream=~".+"} |~ "Completed loading of configuration file" [60s])) by (container)
In this example, we want to find in logs how many times the line “Completed loading of configuration file” has been within a 60 second interval during 24 hours. We use the log stream selector {stream=~”.+”} for the initial search.
The search results will be too broad as {stream=~”.+”} determines including in output log streams with any label, which is literally everything. In such a case we should count the number of matching logs to make the query faster. In our example, the function count_over_time counts all the log lines within the last 60 seconds that match the filter expression “Completed loading of configuration file”.
In the output we should see a graph like this:

Now we can refine our query to reduce it. Let’s change our interval from 24 up to a few hours to narrow the search field:

On the graph above we can see 3 containers that match our search. Now we should set the target container in second query:
{container="prometheus"} |~ "Completed loading of configuration file"
In the output we will see results according to our query:

So the rule of thumb when filtering logs in LogQL is to search data as any counter first, and then watch the full log to make our queries faster.
Conclusion
In this post I have shown some simple and effective ways to make your Grafana Loki dashboards work faster and find desirable logs quicker. I hope this helps optimize your query performance and make your working with Grafana Loki stack easier.
The post Speeding up Grafana Loki queries by using cache appeared first on SHALB.
]]>The post KCD Ukraine 2023 — Fundraiser appeared first on SHALB.
]]>
As part of KCD Ukraine 2023, you will hear up-to-date reports on Kubernetes, DevOps, and the open source communities’ practices. The event will last approximately 8 hours. All proceeds will go to non-profit organizations Razom for Ukraine and Operation Dvoretskyi.
The meeting will begin on March 16, 2023 at 1:00 PM (EET). The event organizers are the Cloud Native Computing Foundation and the local developer community from Ukraine. You can register to participate on the website.
The post KCD Ukraine 2023 — Fundraiser appeared first on SHALB.
]]>The post Integrating Grafana with Prometheus and Alertmanager appeared first on SHALB.
]]>
In this article I will show how to integrate Grafana with Alertmanager, manage silences by means of Grafana, configure Alertmanager to inhibit alerts, and keep this configuration in code for future cases. Following the steps described below you will learn how to:
- add Alertmanager data source to Grafana by code
- configure Alertmanager to visualize alerts properly
- suppress some alerts via Alertmanager configuration
Requirements
You will need a Kubernetes cluster with installed `kube-prometheus-stack` Helm chart (version 39.5.0). You can use your existing cluster or deploy a testing environment. For an example, see our article Deploying Prometheus Monitoring Stack with Cluster.dev.
Introduction
Starting from v.8.0, Grafana is shipped with an integrated alerting system for acting on metrics and logs from a variety of external sources. At the same time, Grafana is compatible with Alertmanager and Prometheus by default – a combination that most of the industry community benefits from when monitoring Kubernetes clusters.
One of the reasons why we prefer using Alertmanager over a native Grafana alerting is because it is easier to automate when our configuration is in code. For example, while you can define in code Grafana-managed visualization panels to have them reused afterward, it will be much harder to manage. Alertmanager also comes together with Prometheus in the `kube-prometheus-stack` Helm chart – a resource we use to monitor Kubernetes clusters.
Grafana integration with Alertmanager
The first thing we do is configure Grafana integration with Alertmanager.
In order to make it automatic, add the following code to `kube-prometheus-stack` values:
2
3
4
5
6
7
8
9
10
additionalDataSources:
- name: Alertmanager
type: alertmanager
url: <a class="c-link" tabindex="-1" href="http://monitoring-kube-prometheus-alertmanager:9093/" target="_blank" rel="noopener noreferrer" data-stringify-link="http://monitoring-kube-prometheus-alertmanager:9093" data-sk="tooltip_parent" data-remove-tab-index="true">http://monitoring-kube-prometheus-alertmanager:9093</a>
editable: true
access: proxy
version: 2
jsonData:
implementation: prometheus
Customize the value of the `url:` key if it is different in your case. Deploy the code to your cluster and check it in Grafana data sources.

Then check active alerts – you should see at least one default alert.

Add Alertmanager configuration
Sometimes you can’t avoid alerts duplication during current integration, but I believe that in most cases it is possible. To see alerts without duplication you need to configure Alertmanager properly. This means having one receiver per alert.
In our case, to keep things simple we will add two receivers:
`blackhole` – for alerts with zero priority and no need to be sent
`default` – for alerts with severity level: info, warning, critical
The `default` receiver should have all needed notification channels. In our case we have two example channels – `telegram` and `slack`.
To automate the setup of Alertmanager configuration, add the following code to the `kube-prometheus-stack` yaml file:
2
3
4
5
6
7
8
9
10
11
12
13
14
15
16
17
18
19
20
21
22
23
24
25
26
27
28
29
30
31
32
33
34
35
36
config:
global:
resolve_timeout: 5m
route:
group_by: [...]
group_wait: 9s
group_interval: 9s
repeat_interval: 120h
receiver: blackhole
routes:
- receiver: default
group_by: [...]
match_re:
severity: "info|warning|critical"
continue: false
repeat_interval: 120h
receivers:
- name: blackhole
- name: default
telegram_configs:
- chat_id: -000000000
bot_token: 0000000000:00000000000000000000000000000000000
message: |
'Status: <a href="<a class="c-link" href="https://127.0.0.1/" target="_blank" rel="noopener noreferrer" data-stringify-link="https://127.0.0.1" data-sk="tooltip_parent">https://127.0.0.1</a>">{{ .Status }}</a>'
'{{ .CommonAnnotations.message }}'
api_url: <a class="c-link" href="https://127.0.0.1/" target="_blank" rel="noopener noreferrer" data-stringify-link="https://127.0.0.1" data-sk="tooltip_parent">https://127.0.0.1</a>
parse_mode: HTML
send_resolved: true
slack_configs:
- api_url: <a class="c-link" href="https://127.0.0.1/services/00000000000/00000000000/000000000000000000000000" target="_blank" rel="noopener noreferrer" data-stringify-link="https://127.0.0.1/services/00000000000/00000000000/000000000000000000000000" data-sk="tooltip_parent">https://127.0.0.1/services/00000000000/00000000000/000000000000000000000000</a>
username: alertmanager
title: "Status: {{ .Status }}"
text: "{{ .CommonAnnotations.message }}"
title_link: "<a class="c-link" href="https://127.0.0.1/" target="_blank" rel="noopener noreferrer" data-stringify-link="https://127.0.0.1" data-sk="tooltip_parent">https://127.0.0.1</a>"
send_resolved: true
Deploy the code to your cluster and check for active alerts – they should not be duplicated.

Add example inhibition rules
In some cases we want to disable alerts via silences and sometimes it is better to do it in code. Silence is good as a temporary measure. It is, however, impermanent and has to be recreated again if you deploy to an empty cluster. Disabling alerts via code, on the other hand, is a sustainable solution that can be used for repeated deployments.
Disabling alerts via silence is simple – just open the Silences tab and create one with a desired duration, for example `99999d`. If you have persistent storage enabled for Alertmanager such silence is permanent.

This section refers mostly to a second case, because adding silence as code is not an easy task. We will disable two test alerts by the `Watchdog` alert, which is always firing by default.
Add this code to `kube-prometheus-stack` yaml file:
2
3
4
5
- target_matchers:
- alertname =~ "ExampleTwoAlertToInhibit|ExampleOneAlertToInhibit"
source_matchers:
- alertname = Watchdog
The resulting code should look like this:
2
3
4
5
6
7
8
9
10
11
12
13
14
15
16
17
18
19
20
21
22
23
24
25
26
27
28
29
30
31
32
33
34
35
36
37
38
39
40
41
config:
global:
resolve_timeout: 5m
route:
group_by: [...]
group_wait: 9s
group_interval: 9s
repeat_interval: 120h
receiver: blackhole
routes:
- receiver: default
group_by: [...]
match_re:
severity: "info|warning|critical"
continue: false
repeat_interval: 120h
inhibit_rules:
- target_matchers:
- alertname =~ "ExampleAlertToInhibitOne|ExampleAlertToInhibitTwo"
source_matchers:
- alertname = Watchdog
receivers:
- name: blackhole
- name: default
telegram_configs:
- chat_id: -000000000
bot_token: 0000000000:00000000000000000000000000000000000
message: |
'Status: <a href="<a class="c-link" tabindex="-1" href="https://127.0.0.1/" target="_blank" rel="noopener noreferrer" data-stringify-link="https://127.0.0.1" data-sk="tooltip_parent" data-remove-tab-index="true">https://127.0.0.1</a>">{{ .Status }}</a>'
'{{ .CommonAnnotations.message }}'
api_url: <a class="c-link" tabindex="-1" href="https://127.0.0.1/" target="_blank" rel="noopener noreferrer" data-stringify-link="https://127.0.0.1" data-sk="tooltip_parent" data-remove-tab-index="true">https://127.0.0.1</a>
parse_mode: HTML
send_resolved: true
slack_configs:
- api_url: <a class="c-link" tabindex="-1" href="https://127.0.0.1/services/00000000000/00000000000/000000000000000000000000" target="_blank" rel="noopener noreferrer" data-stringify-link="https://127.0.0.1/services/00000000000/00000000000/000000000000000000000000" data-sk="tooltip_parent" data-remove-tab-index="true">https://127.0.0.1/services/00000000000/00000000000/000000000000000000000000</a>
username: alertmanager
title: "Status: {{ .Status }}"
text: "{{ .CommonAnnotations.message }}"
title_link: "<a class="c-link" tabindex="-1" href="https://127.0.0.1/" target="_blank" rel="noopener noreferrer" data-stringify-link="https://127.0.0.1" data-sk="tooltip_parent" data-remove-tab-index="true">https://127.0.0.1</a>"
send_resolved: true
Deploy the code to your cluster. Add test alerts with the following code:
2
3
4
5
6
7
8
9
10
11
12
13
kind: PrometheusRule
metadata:
name: test-rules
namespace: monitoring
spec:
groups:
- name: "test alerts"
rules:
- alert: ExampleAlertToInhibitOne
expr: vector(1)
- alert: ExampleAlertToInhibitTwo
expr: vector(1)
Deploy the code with test alerts to your cluster, check the existence of our test rules in the rules list. Wait for 1-3 minutes to see the test alerts; those alerts should be suppressed.

Conclusion
In this article we have reviewed a generic case of integrating Grafana with Alertmanager, learnt how to manage silences in Grafana, and inhibit alerts via Alertmanager in code. Now you will be able to manage your alerts in an easy and reproducible way with minimal code. Basic code examples are ready to be used in your projects and can be applicable to any configuration.
The post Integrating Grafana with Prometheus and Alertmanager appeared first on SHALB.
]]>The post Pitfalls of cloud migration appeared first on SHALB.
]]>
However, apart from migration milestones, there are things that also need consideration. Seemingly of less importance, they can overshadow the brightest cloud strategy if left neglected. In this blogpost we shall outline which things may come as unexpected obstacles on the way towards building an effective cloud strategy.
Complicated pricing
In theory, the pricing model of cloud services is fairly straightforward: you request the capacity, get it from a cloud vendor, and pay for it. You manage your cloud resources by spinning them up and down, and pay only for as much as you have used. Unfortunately, it’s not all that simple.
To begin with, you have to wade through the variety of options that your cloud provider offers. Operating systems, compute, network, memory, and disk space – all these factors are counted when defining the type and size of your instance and, subsequently, its pricing. And this is just the tip of an iceberg. For example, in AWS each of the instance types falls within a special category aimed to fit different use cases, such as general purpose, compute optimized, storage optimized, memory optimized, and accelerated computing. On top of that, each instance type comprises a family of virtual machines that vary in size, i.e. number of CPU cores and memory, and features. With so many details and nuances picking out the right combination of instances could be quite challenging.
There is also a problem with a cloud management console: you can’t get a clear idea of what you are spending unless you are familiar with the cloud UI. For example, to understand the whole picture of your spending in AWS you have to apply for each service in each region isolatedly due to the utmost independence of components in AWS. Needless to say, this takes a lot of time and effort. And don’t forget – each service is billed in a different way, which is really confusing as you start using more services from your cloud provider.
Default security
Most cloud vendors aim to create a secure solution for their customers. In order to achieve this they provide a centralized security policy that embraces base security issues: protection from external and insider cybersecurity threats, enhanced traffic analysis and web filtering, monitoring of network events, etc.
However, no matter how cloud vendors try to avoid security issues with the services they provide, they can’t control how customers use their services. Insecure application programming interfaces (APIs), poor configuration, sensitive data, and weak access policies – all these factors pose a potential threat to your system and data. In other words, the security of your own space within the cloud is your responsibility. First and foremost, this applies to protecting your data and controlling who can access that data.
It is a good practice to authenticate by private keys instead of passwords and close unused open ports. To prevent unauthorised access, use access control lists and IP filtering. Be sure to encrypt your data. Overall, cloud migration is a good occasion to revise your safety strategy and build security into every level of your system.
Right type of cloud architecture
Simply transitioning your application to the cloud doesn’t mean that it is going to deliver the value that enterprises expect. In order to successfully adopt a cloud computing model and reap all its benefits, you need the right type of application architecture. There is no “one size fits all” approach. Rather, it is your business and technology service requirements that define the type of cloud architecture for your project.
You don’t need to virtualize everything across the board. For example, you can keep main workloads on bare-metal servers and quickly scale them with cloud resources when needed.
From baseline to more complex ones, including multi-data center architecture, hybrid cloud site architectures, global server load balancing, etc., effective cloud architectures follow certain design principles. These fundamental rules include:
- following best practices and software development concepts when designing cloud-ready applications;
- implementing redundant design with duplication of critical components for failover and recovery purpose;
- load balancing for controlling and distributing traffic according to certain patterns;
- modelling and design for performance and scaling;
- using redundant architecture types for production workloads, and non-redundant for development or testing environments only.
Less of administering overhead
Virtualization and absence of hardware level doesn’t mean that you can do without system administrators. This is by no means true. Cloud migration neither eliminates the necessity to administer your resources, nor could it replace the work of your admin staff. Moreover, when it comes to setup and maintenance, cloud infrastructures need no less attention than physical ones: think of configuring and managing virtual machines and networks, IpsecVPN setup, configuring VPC firewalls, performing cloud backups (other than snapshots), etc. Add here setup of CI/CD pipelines, capturing infrastructure in code, configuring logging and monitoring, and you will see that clouds have plenty of tasks for your admins to work over.
Conclusion
Clouds entice businesses with convenience of use and flexible usability model. However, its seeming plainness may turn out treacherous unless you consider all details before the migration. Among main challenges that could undermine cloud strategy are unexpected expenses, cloud complexity and security of cloud environments.
The post Pitfalls of cloud migration appeared first on SHALB.
]]>